


.jpg)


![Slotted CSMA/CA Algorithm [16] | Download Scientific Diagram](https://www.researchgate.net/profile/Shubhankar_Majumdar2/publication/313724501/figure/fig5/AS:461968923467778@1487153382093/Slotted-CSMA-CA-Algorithm-16.png)


![Submission Title: [Non-persistent CSMA Mechanism] - ppt download](https://slideplayer.com/slide/15412002/93/images/5/The+Non-persistent+CSMA/CA+Algorithm.jpg)


.jpg)


![Flow chart of CSMA/CA[11] | Download Scientific Diagram](https://www.researchgate.net/profile/Muhammad-Younus-2/publication/278729275/figure/fig2/AS:294427512852481@1447208397354/Basic-operation-of-CSMA-CA-9_Q640.jpg)


.jpg)


![7: Slotted/Un-slotted CSMA-CA Algorithm [ 77 ] | Download Scientific ...](https://www.researchgate.net/profile/Sanatan_Mohanty/publication/47737848/figure/download/fig5/AS:307325303836672@1450283470123/Slotted-Un-slotted-CSMA-CA-Algorithm-77.png)


![Flow chart of CSMA/CA[11] | Download Scientific Diagram](https://www.researchgate.net/profile/Muhammad-Younus-2/publication/278729275/figure/fig1/AS:294427512852480@1447208397331/Flow-chart-of-CSMA-CA11_Q640.jpg)
![Slotted CSMA/CA algorithm [10] | Download Scientific Diagram](https://mavink.com/images/loadingwhitetransparent.gif)


![Flow chart of CSMA/CA[11] | Download Scientific Diagram](https://www.researchgate.net/profile/Muhammad_Younus7/publication/278729275/figure/download/fig1/AS:294427512852480@1447208397331/Flow-chart-of-CSMA-CA11.png)
.jpg)


![Flow chart of CSMA/CA[11] | Download Scientific Diagram](https://www.researchgate.net/publication/369234121/figure/fig1/AS:11431281167933635@1686794940942/Sender-and-receiver-relationship-in-CSMA-CA-model-5_Q640.jpg)

![Slotted CSMA/CA algorithm [10] | Download Scientific Diagram](https://www.researchgate.net/publication/334097313/figure/fig1/AS:774850381623297@1561750135570/Slotted-CSMA-CA-algorithm-10_Q640.jpg)

+If+busy+Else.jpg)


![Submission Title: [Non-Persistent CSMA Mechanism] - ppt download](https://slideplayer.com/slide/15323586/92/images/6/The+Non-persistent+CSMA/CA+Algorithm.jpg)

![6LoWPAN unslotted CSMA/CA algorithm [9]. | Download Scientific Diagram](https://www.researchgate.net/publication/258391238/figure/fig11/AS:1088983744421888@1636645365000/6LoWPAN-unslotted-CSMA-CA-algorithm-9.jpg)


![Submission Title: [Non-persistent CSMA Mechanism] - ppt download](https://slideplayer.com/slide/15412002/93/images/8/The+Non-persistent+CSMA/CA+Algorithm.jpg)
![CSMA-CA Mechanism [32]. NB Refers to the Number of Backoffs Done by the ...](https://www.researchgate.net/profile/Hamid-Hajaje-2/publication/350550787/figure/fig2/AS:1007769821929477@1617282457396/CSMA-CA-Mechanism-32-NB-Refers-to-the-Number-of-Backoffs-Done-by-the-Node-and-CW-is-a.png)


![Submission Title: [Non-persistent CSMA Mechanism] - ppt download](https://slideplayer.com/slide/16393373/95/images/8/The+Non-persistent+Slotted+CSMA/CA+Algorithm.jpg)
![3 -Algorithme du backoff d'accès au medium CSMA/CA [Far11] | Download ...](https://www.researchgate.net/profile/Insaf-Sassi/publication/333130860/figure/fig2/AS:1078886301470722@1634237947252/Algorithme-du-backoff-dacces-au-medium-CSMA-CA-Far11_Q320.jpg)
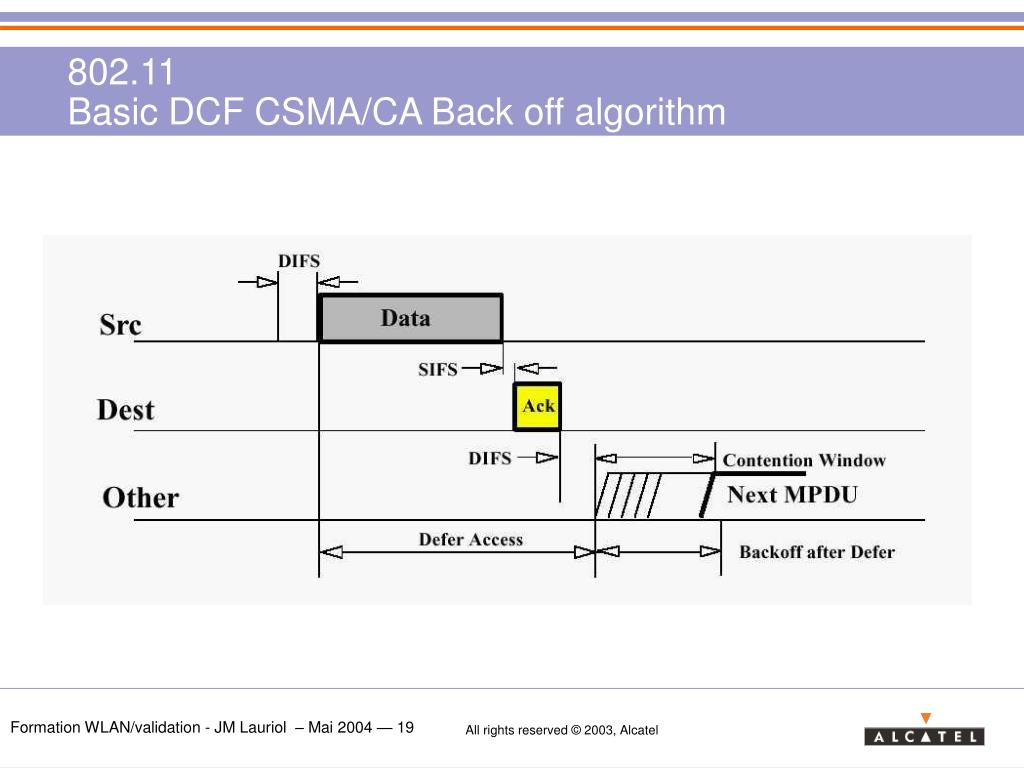
Embark on an remarkable adventure with our timing diagram for the csma ca back-off algorithm. figure 11 collection featuring hundreds of captivating images. showcasing the dynamic nature of play, doll, and game. designed to inspire exploration and discovery. Our timing diagram for the csma ca back-off algorithm. figure 11 collection features high-quality images with excellent detail and clarity. Suitable for various applications including web design, social media, personal projects, and digital content creation All timing diagram for the csma ca back-off algorithm. figure 11 images are available in high resolution with professional-grade quality, optimized for both digital and print applications, and include comprehensive metadata for easy organization and usage. Our timing diagram for the csma ca back-off algorithm. figure 11 gallery offers diverse visual resources to bring your ideas to life. Advanced search capabilities make finding the perfect timing diagram for the csma ca back-off algorithm. figure 11 image effortless and efficient. Regular updates keep the timing diagram for the csma ca back-off algorithm. figure 11 collection current with contemporary trends and styles. Instant download capabilities enable immediate access to chosen timing diagram for the csma ca back-off algorithm. figure 11 images. Multiple resolution options ensure optimal performance across different platforms and applications. Comprehensive tagging systems facilitate quick discovery of relevant timing diagram for the csma ca back-off algorithm. figure 11 content.