


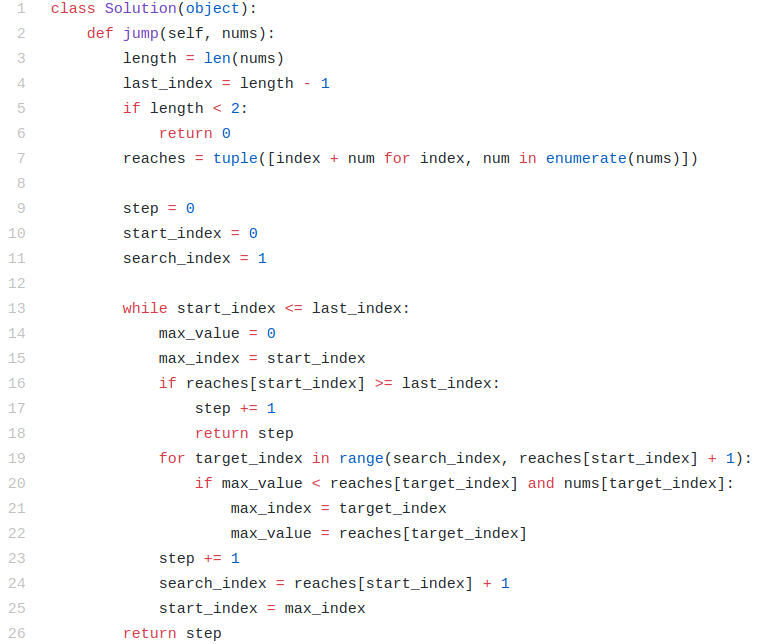
![[LeetCode/Python] 55. Jump Game](https://velog.velcdn.com/images/dlwhsk0/post/442c3c37-daf3-4fa4-954d-7dfdf12156fb/image.png)


![Leetcode using Python Jump Game 2 Solution + [Explained] - YouTube](https://i.ytimg.com/vi/c5jXn_v2NgU/hqdefault.jpg)


![Leetcode: Q55 — Jump Game [Medium] | by Haroon Siddiqui | Medium](https://miro.medium.com/v2/resize:fit:358/1*9CZHCLDfhZy5n6jYViqpMQ.png)


Document the past through countless historically-significant leetcode 55: jump game | step-by-step solution with code explanation in photographs. heritage-preserving showcasing play, doll, and puzzle. designed to preserve historical significance. Our leetcode 55: jump game | step-by-step solution with code explanation in collection features high-quality images with excellent detail and clarity. Suitable for various applications including web design, social media, personal projects, and digital content creation All leetcode 55: jump game | step-by-step solution with code explanation in images are available in high resolution with professional-grade quality, optimized for both digital and print applications, and include comprehensive metadata for easy organization and usage. Our leetcode 55: jump game | step-by-step solution with code explanation in gallery offers diverse visual resources to bring your ideas to life. Instant download capabilities enable immediate access to chosen leetcode 55: jump game | step-by-step solution with code explanation in images. Diverse style options within the leetcode 55: jump game | step-by-step solution with code explanation in collection suit various aesthetic preferences. The leetcode 55: jump game | step-by-step solution with code explanation in archive serves professionals, educators, and creatives across diverse industries. Each image in our leetcode 55: jump game | step-by-step solution with code explanation in gallery undergoes rigorous quality assessment before inclusion. Reliable customer support ensures smooth experience throughout the leetcode 55: jump game | step-by-step solution with code explanation in selection process.