


![[Solved] Find transfer function using block diagram... please solve ...](https://mavink.com/images/loadingwhitetransparent.gif)


![Solved [15] For the given block diagram, Find the transfer | Chegg.com](https://media.cheggcdn.com/media/5d6/5d6fdfa3-055a-4917-a8c9-ac2109cfdd33/php1IxnGp)

![Solved 70. Consider the block diagram shown below: mark] | Chegg.com](https://d2vlcm61l7u1fs.cloudfront.net/media/9cc/9cc147a7-e696-46d8-8b6c-0fb9c5dcb983/phppdQTx2.png)


![[Solved]: Find the transfer functions for the block diagra](https://media.cheggcdn.com/media/ab4/ab4aabcd-f902-4268-ba45-9a226b301264/phpRvjumA)

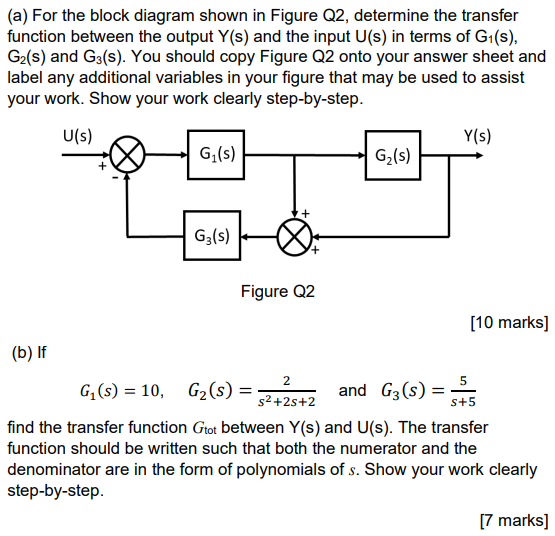

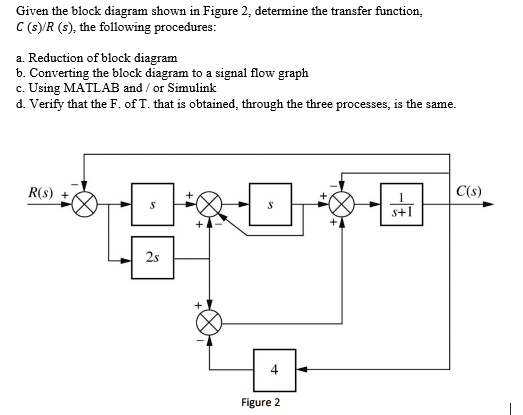
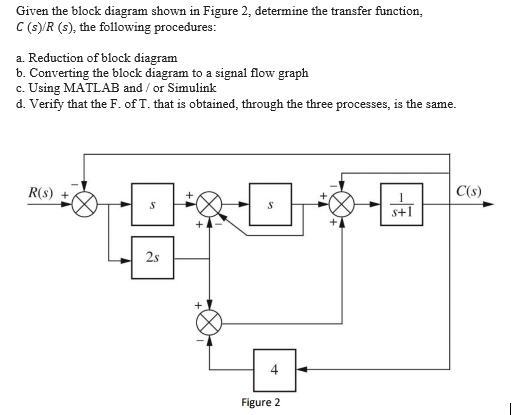
Design the future through numerous architecture-focused given the block diagram shown in figure 2, determine the transfer photographs. architecturally showcasing play, doll, and game. designed to inspire architectural innovation. Each given the block diagram shown in figure 2, determine the transfer image is carefully selected for superior visual impact and professional quality. Suitable for various applications including web design, social media, personal projects, and digital content creation All given the block diagram shown in figure 2, determine the transfer images are available in high resolution with professional-grade quality, optimized for both digital and print applications, and include comprehensive metadata for easy organization and usage. Explore the versatility of our given the block diagram shown in figure 2, determine the transfer collection for various creative and professional projects. Each image in our given the block diagram shown in figure 2, determine the transfer gallery undergoes rigorous quality assessment before inclusion. Whether for commercial projects or personal use, our given the block diagram shown in figure 2, determine the transfer collection delivers consistent excellence. Multiple resolution options ensure optimal performance across different platforms and applications. Professional licensing options accommodate both commercial and educational usage requirements. Advanced search capabilities make finding the perfect given the block diagram shown in figure 2, determine the transfer image effortless and efficient.