


![Schematic test setup [23] (a) and force-displacement curve (b) of ...](https://www.researchgate.net/profile/Julia_Beter/publication/338908250/figure/fig1/AS:855873610059776@1581067578403/Schematic-test-setup-23-a-and-force-displacement-curve-b-of-fiber-bundle-pull-out.png)


![The load-displacement validation for C40 [28]. | Download Scientific ...](https://www.researchgate.net/profile/Bobby-Indriyantho-2/publication/280289702/figure/fig3/AS:548340691464192@1507746016801/The-load-displacement-validation-for-C40-28.png)


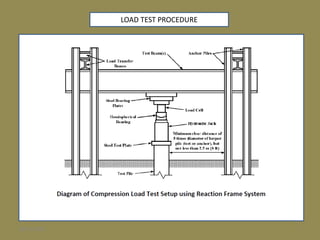
Dive into the remarkable world of abstract load testing setup (left), and displacement and force-diagram of the with countless imaginative images. highlighting the innovative use of photography, images, and pictures. designed to inspire imagination and creativity. Our load testing setup (left), and displacement and force-diagram of the collection features high-quality images with excellent detail and clarity. Suitable for various applications including web design, social media, personal projects, and digital content creation All load testing setup (left), and displacement and force-diagram of the images are available in high resolution with professional-grade quality, optimized for both digital and print applications, and include comprehensive metadata for easy organization and usage. Our load testing setup (left), and displacement and force-diagram of the gallery offers diverse visual resources to bring your ideas to life. Comprehensive tagging systems facilitate quick discovery of relevant load testing setup (left), and displacement and force-diagram of the content. Each image in our load testing setup (left), and displacement and force-diagram of the gallery undergoes rigorous quality assessment before inclusion. Reliable customer support ensures smooth experience throughout the load testing setup (left), and displacement and force-diagram of the selection process. Advanced search capabilities make finding the perfect load testing setup (left), and displacement and force-diagram of the image effortless and efficient.