


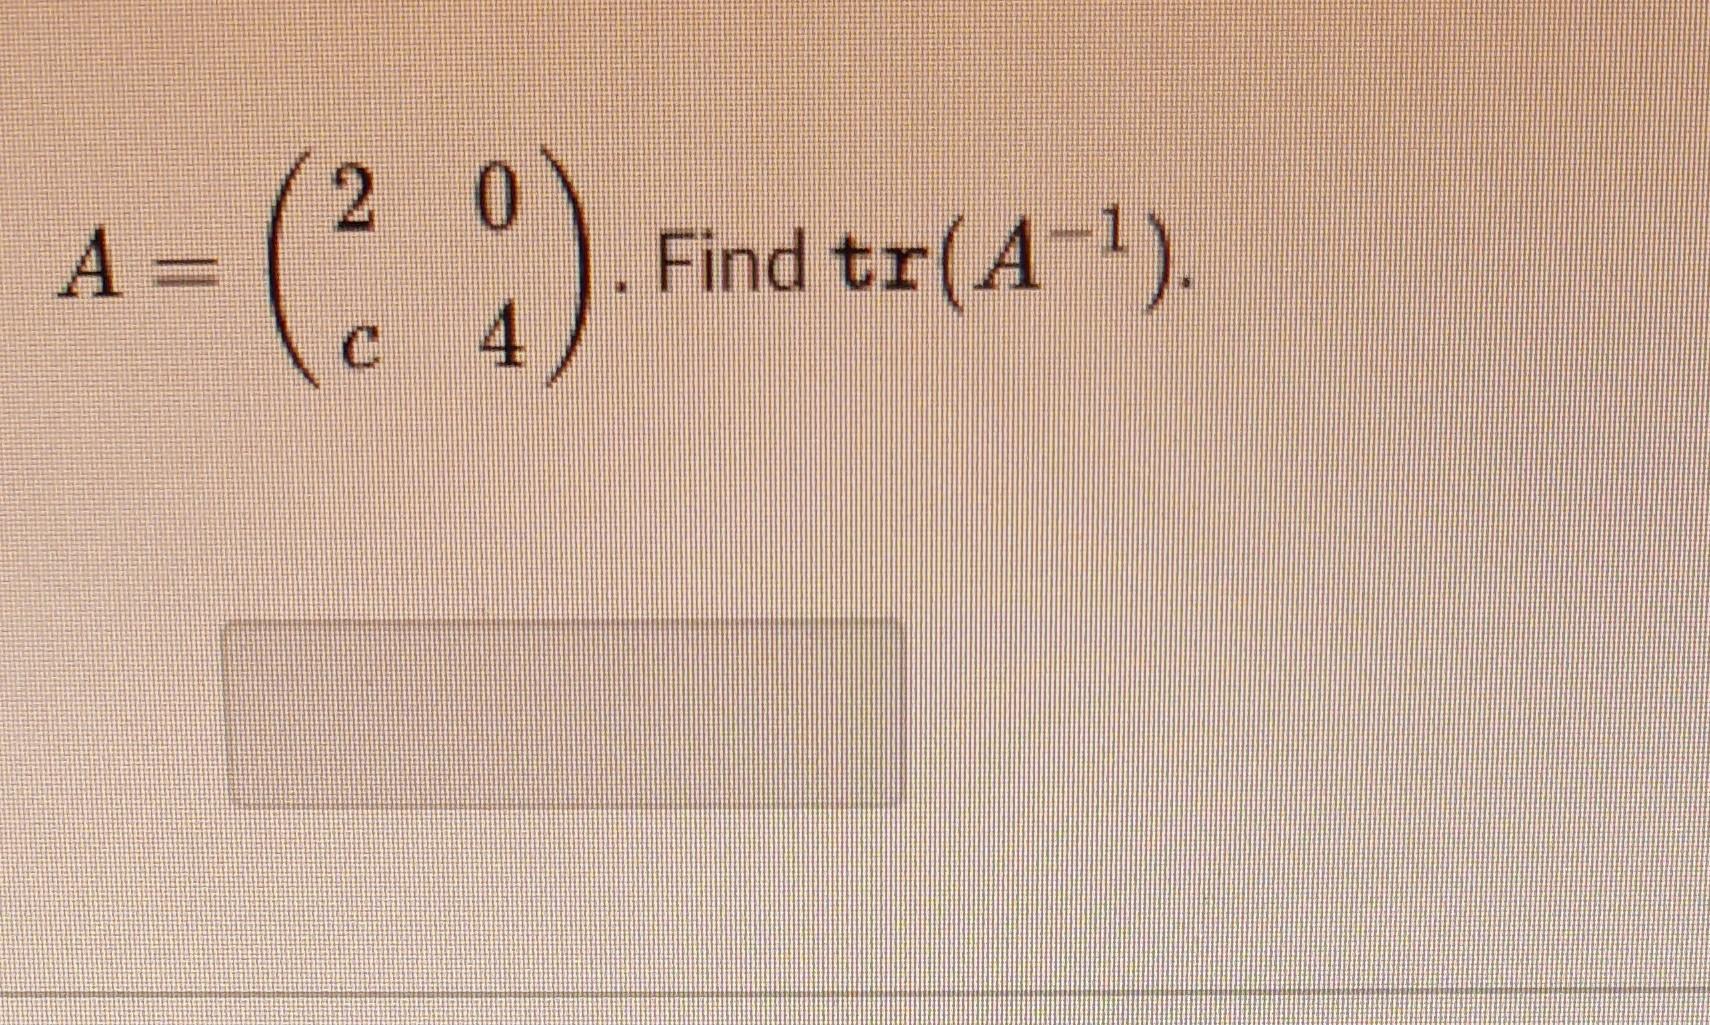
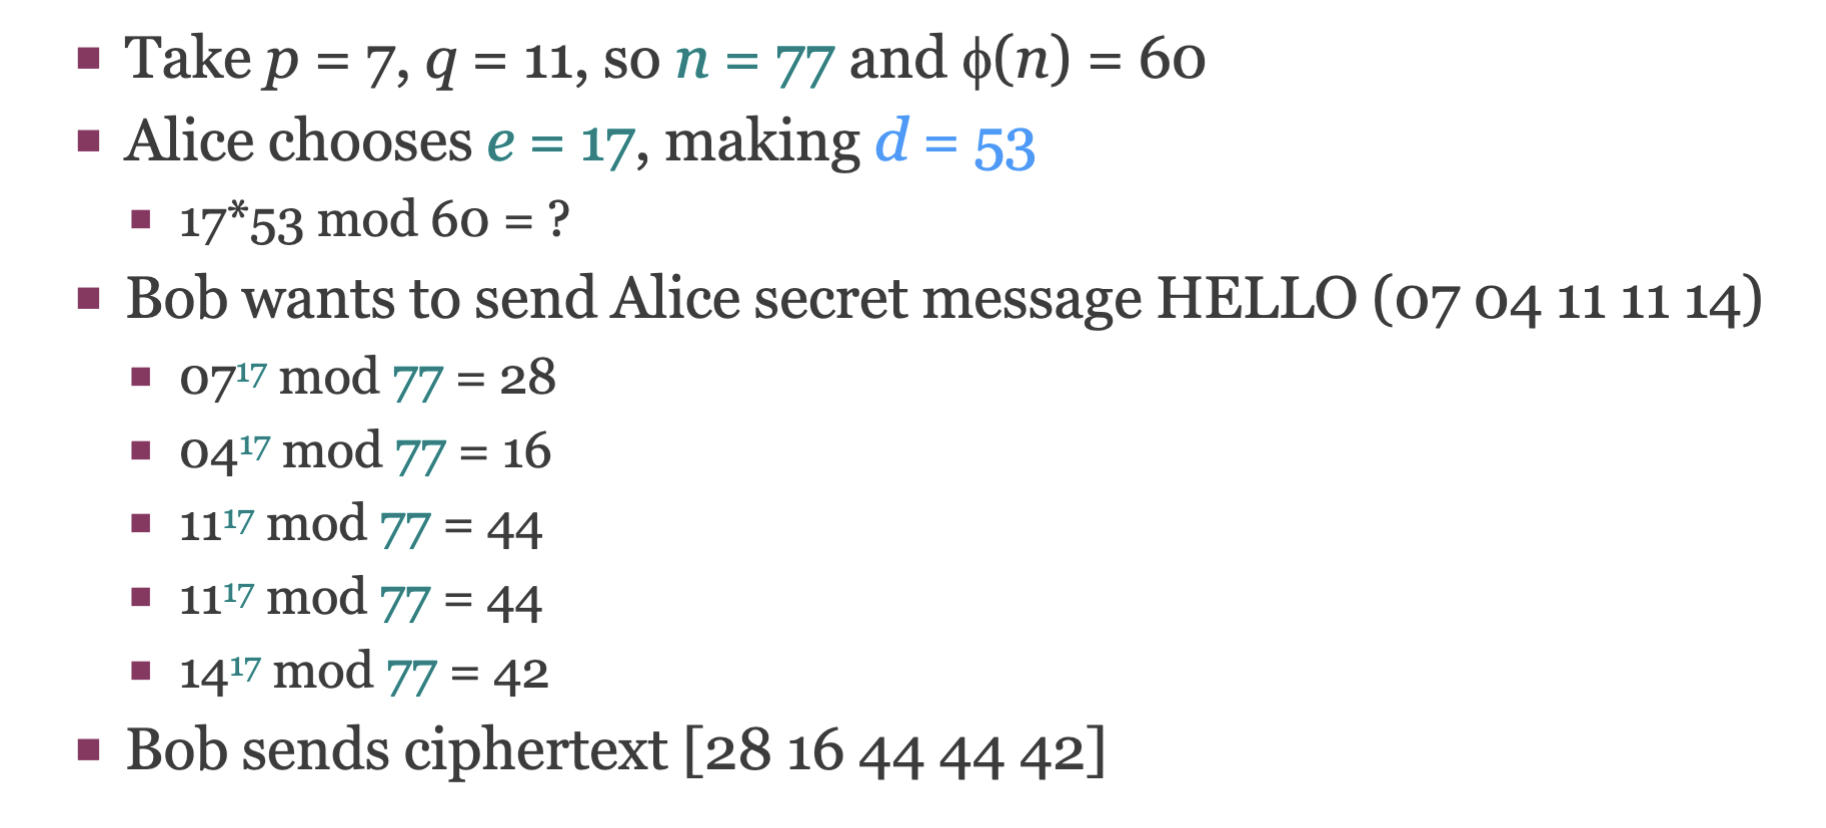
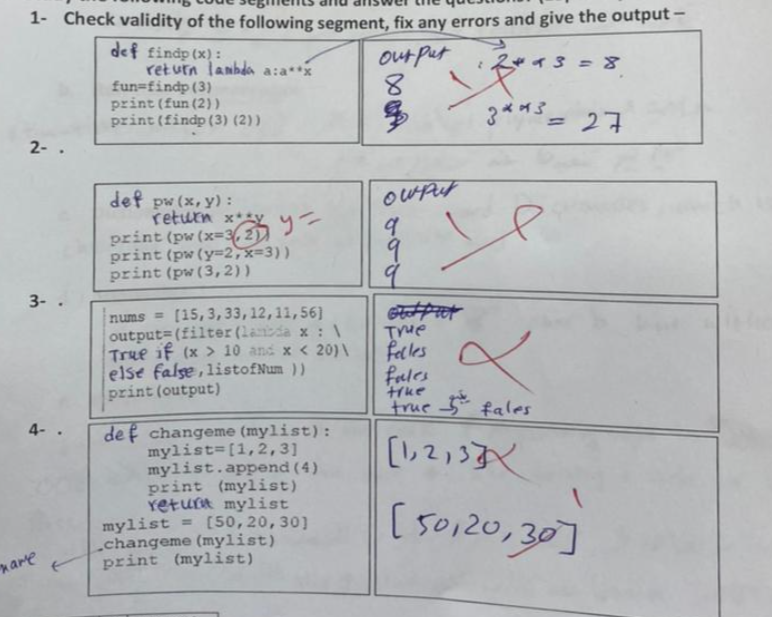
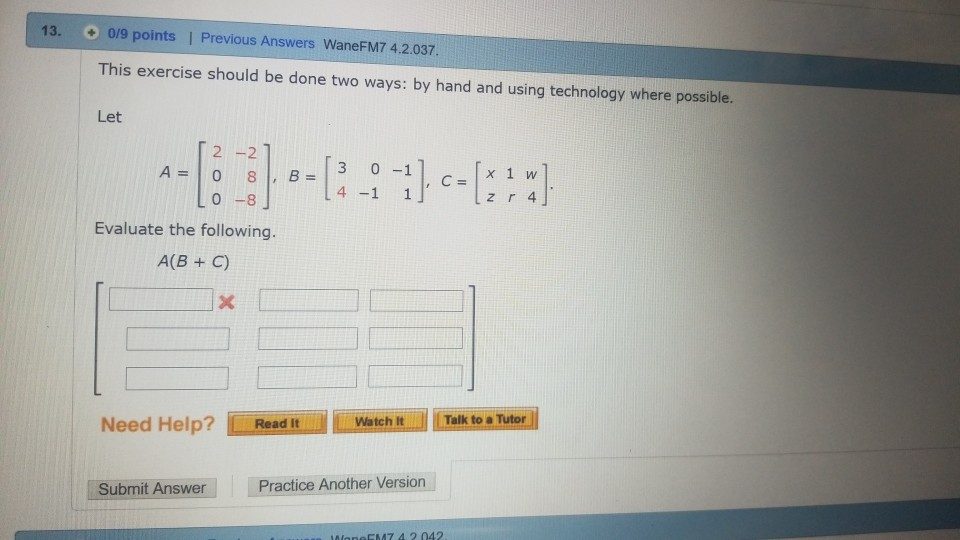
![Solved In Exercises 27 and 28, find (a) |A] and (b) JA- 1 0 | Chegg.com](https://d2vlcm61l7u1fs.cloudfront.net/media/810/8101379e-06f1-4628-ae47-aa38212073eb/image)

![Solved A=[7−282] and B=[1−48−6] then A(2B)=[1] Note: You can | Chegg.com](https://media.cheggcdn.com/media/00a/00aa7b9d-2b15-4b39-842e-63764d4a4b40/phpN4nnRn)

![[Solved] i need detail answer of all a, b, c, d in step by step clearly ...](https://mavink.com/images/loadingwhitetransparent.gif)


![Question 3 [5 Points] Using Table 4.2 of GF(28), determine the ...](https://cdn.numerade.com/ask_images/eb4499c4054a432dbb8e1cd33ea4ea8b.jpg)

![Solved (7) [5 points each] In each of the following, either | Chegg.com](https://media.cheggcdn.com/media/bcc/bcc0b63e-b291-4c50-b493-1c0e336dc8f5/phpA0S7W2)


![Solved 2. Given 𝐴=[2−45−71443−61] and 𝒃=[8−2812] (a). Show | Chegg.com](https://media.cheggcdn.com/media/8db/8db48e1c-410f-4812-ab80-bd17f3b4279e/phpxAyEoZ)


![Solved 3. A=[2−314]B=[01−32] a) 2A−B= b) A⋅B=[ ou must show | Chegg.com](https://media.cheggcdn.com/study/651/651017a9-1d28-440c-b771-e9aaf008e48a/image)

![Solved A=[142536]B=[281735]A⊕B=[1B4B2B5B3B6B] Prove that | Chegg.com](https://media.cheggcdn.com/media/a7b/a7b1037e-7fa0-44af-8d9f-4cdf0aba48d6/php9EAOZR)


![Solved A=[287−3] and B=[−7−6−8−2] A(3B)=[ | Chegg.com](https://media.cheggcdn.com/media/985/9855518a-5508-4a58-8d2d-13223c22d12d/phpwRYm3n)

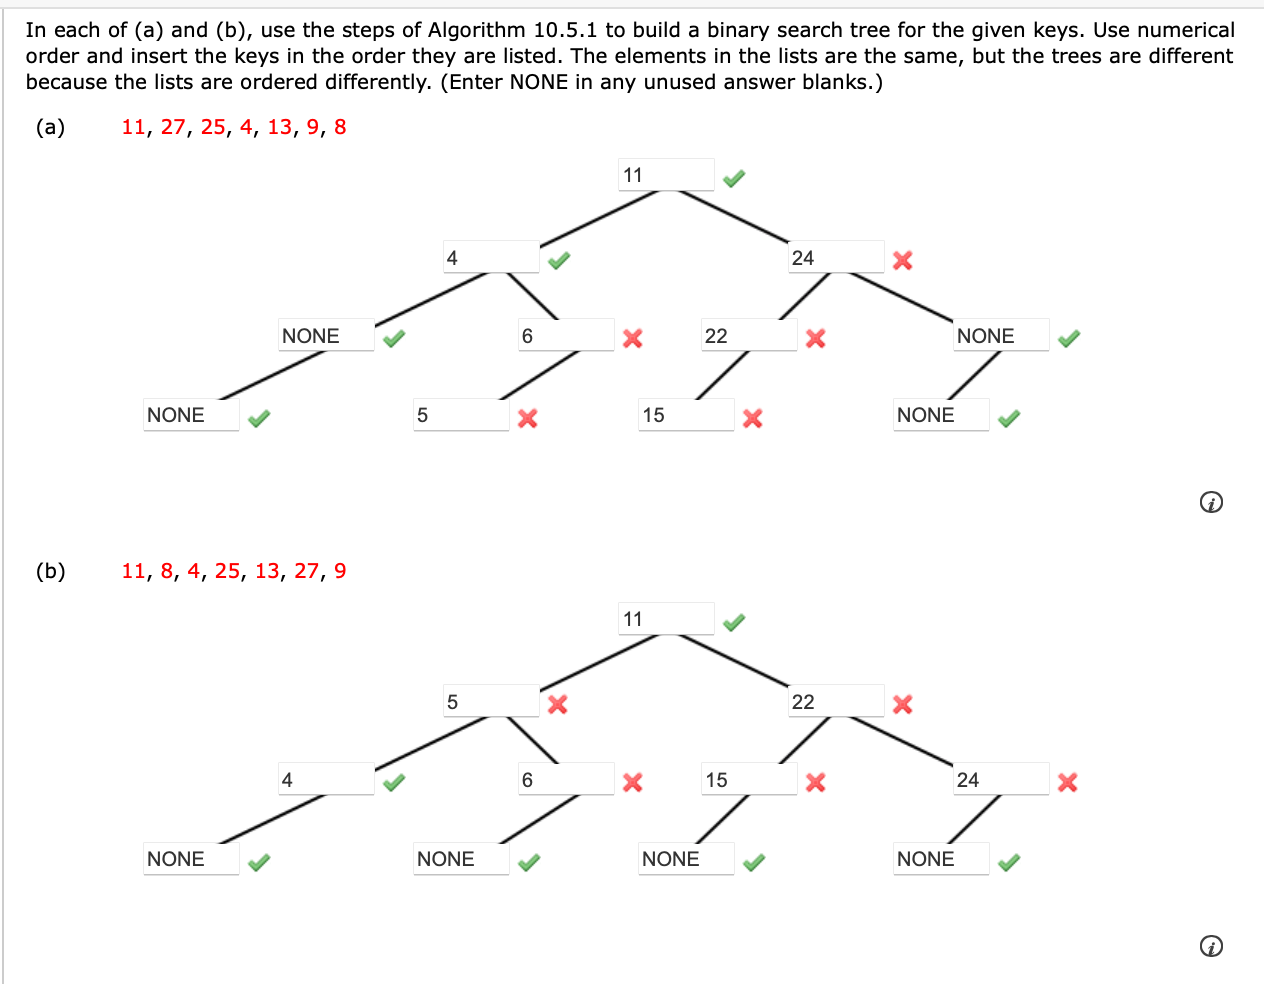
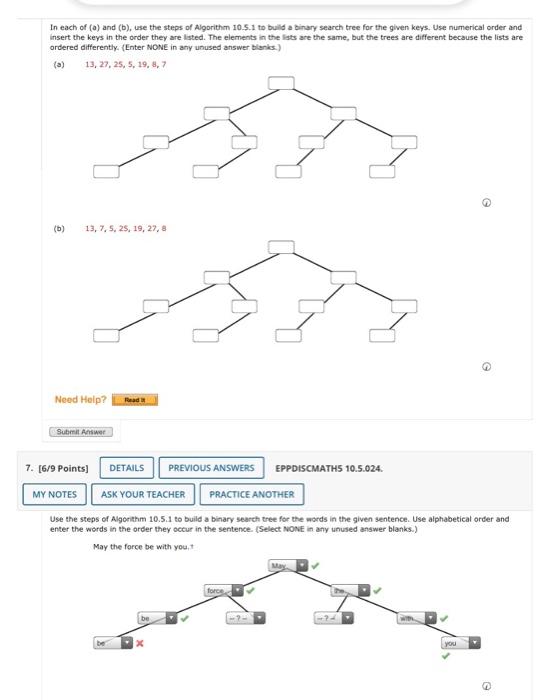
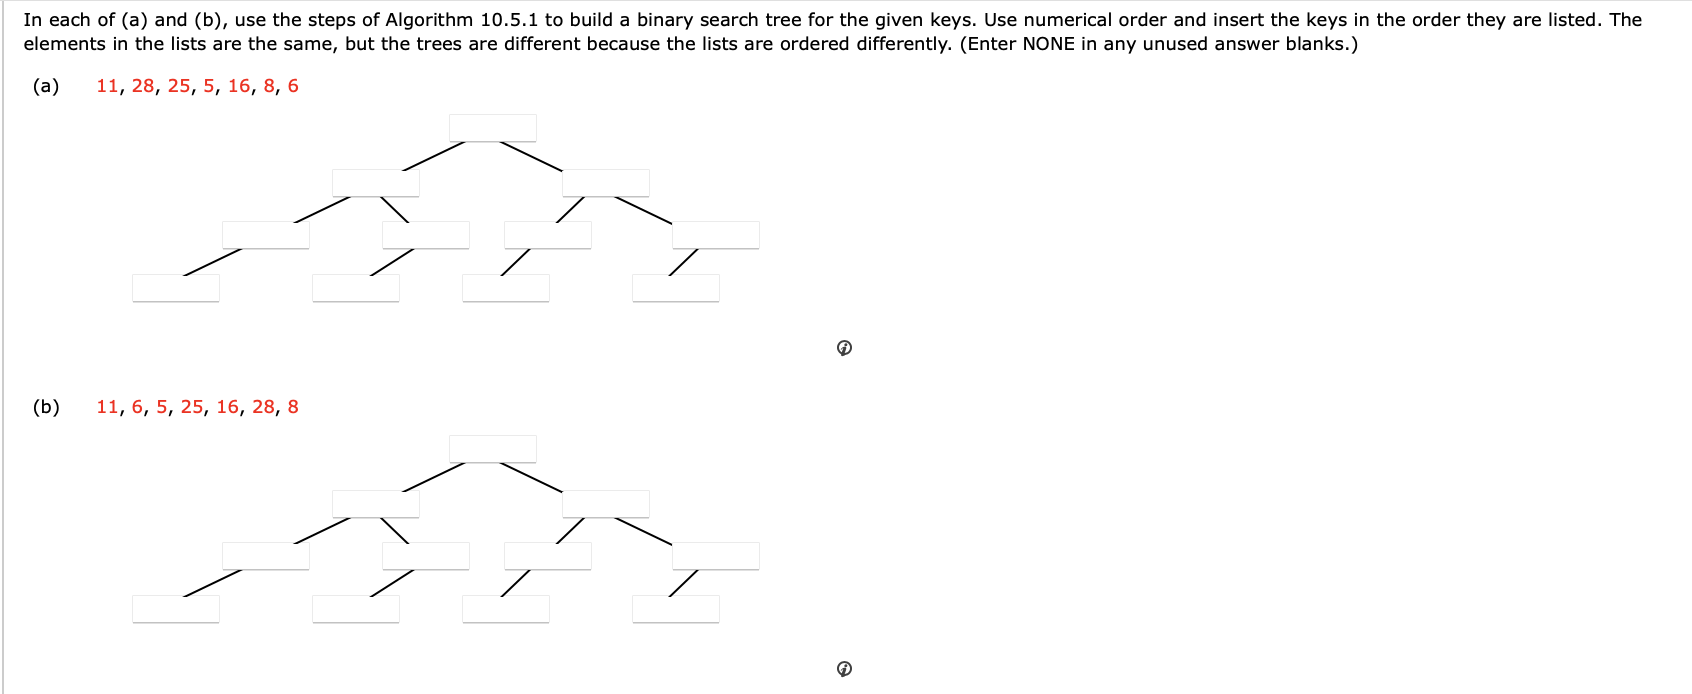
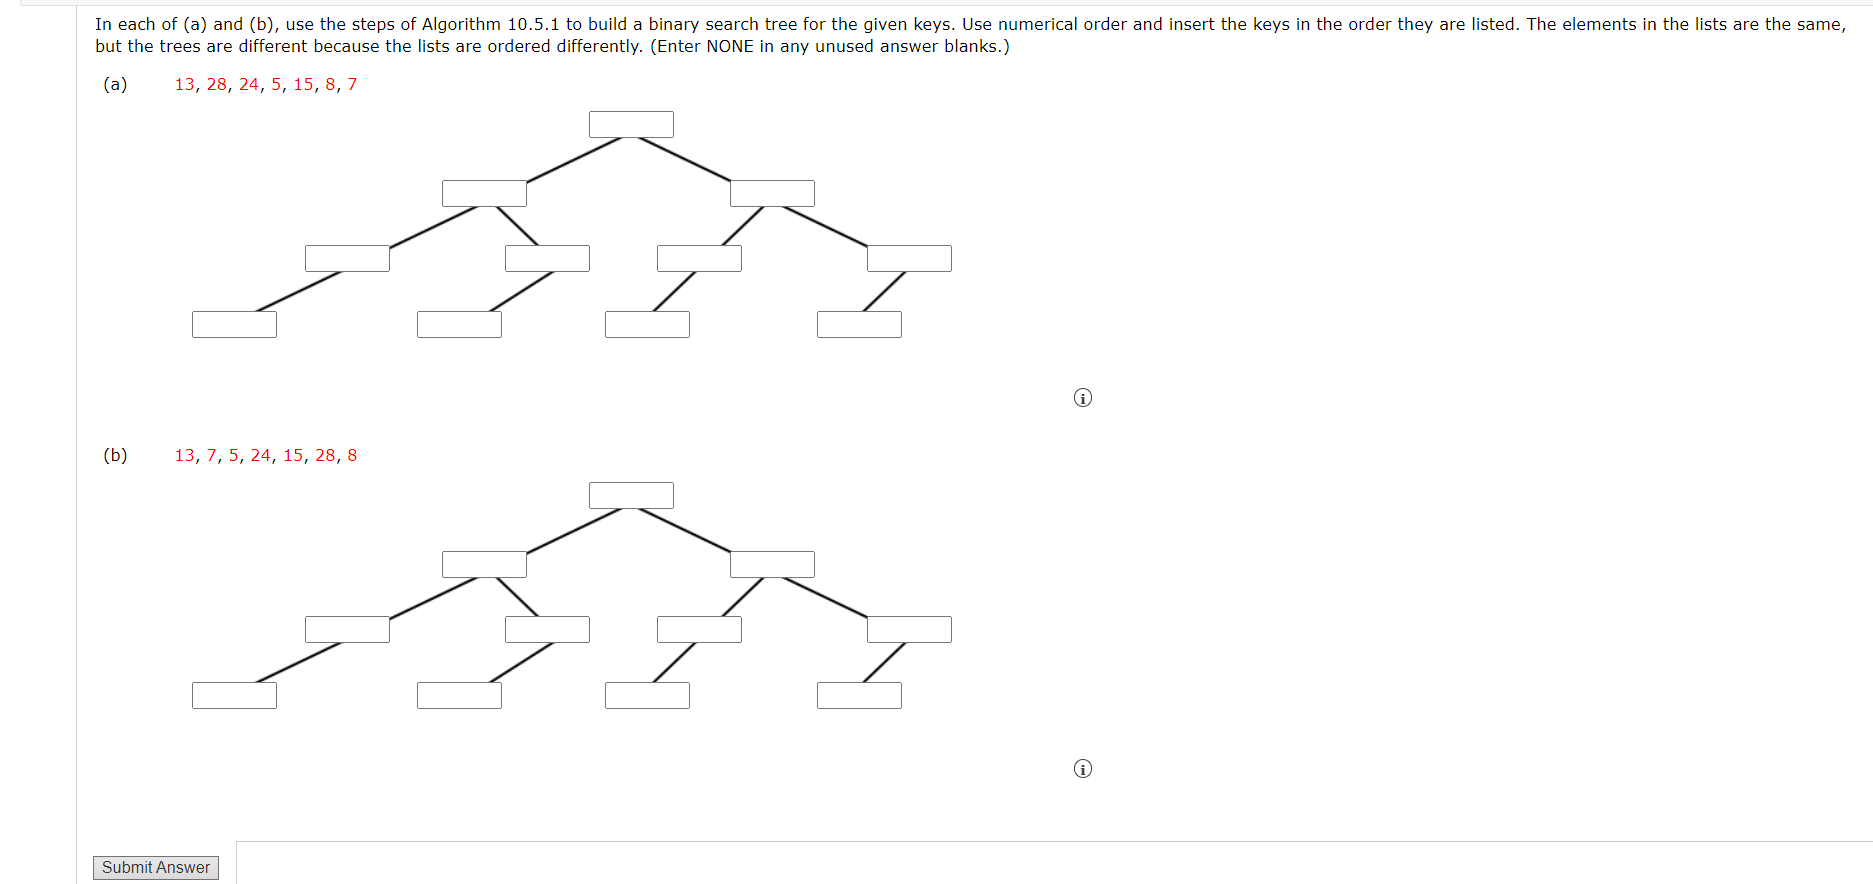
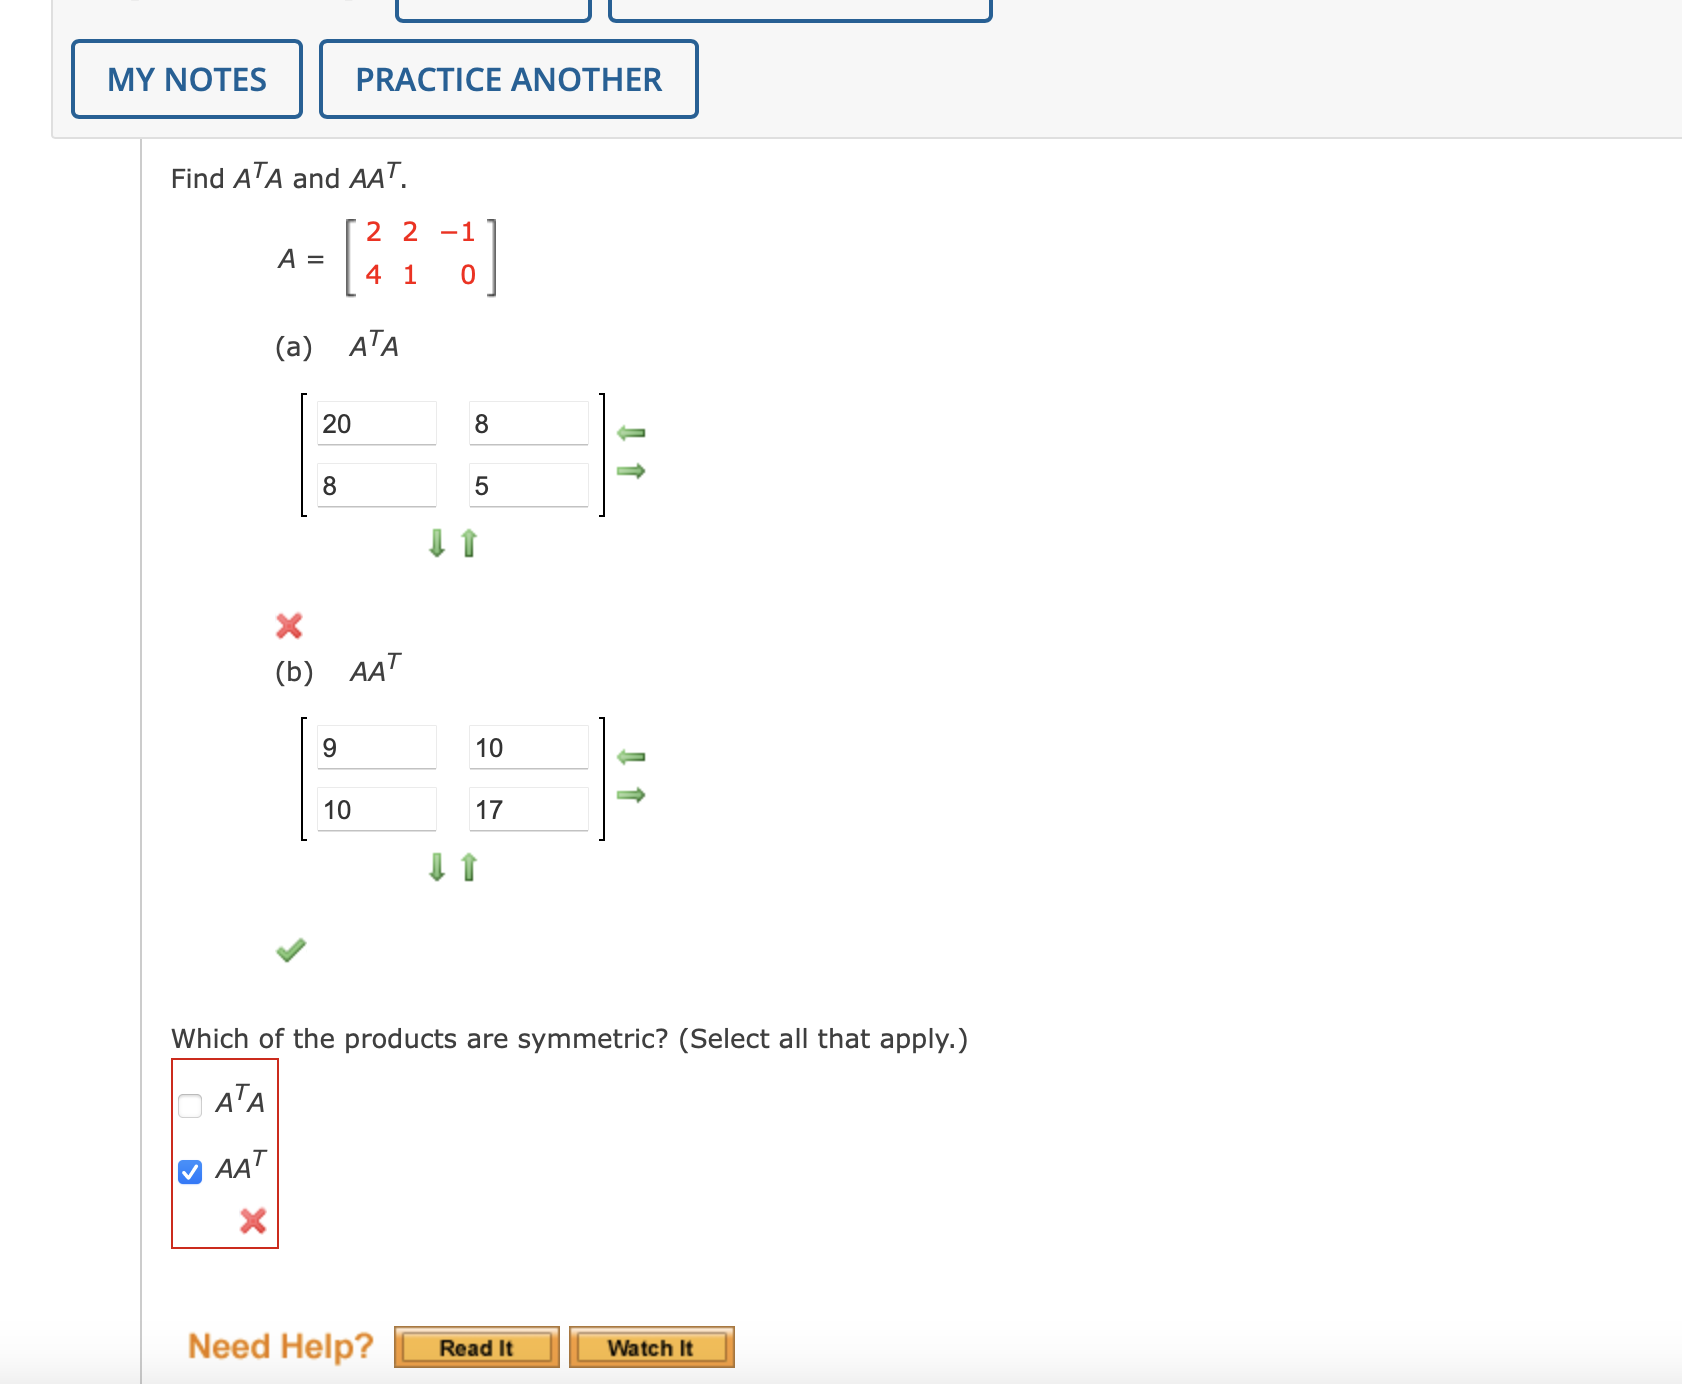
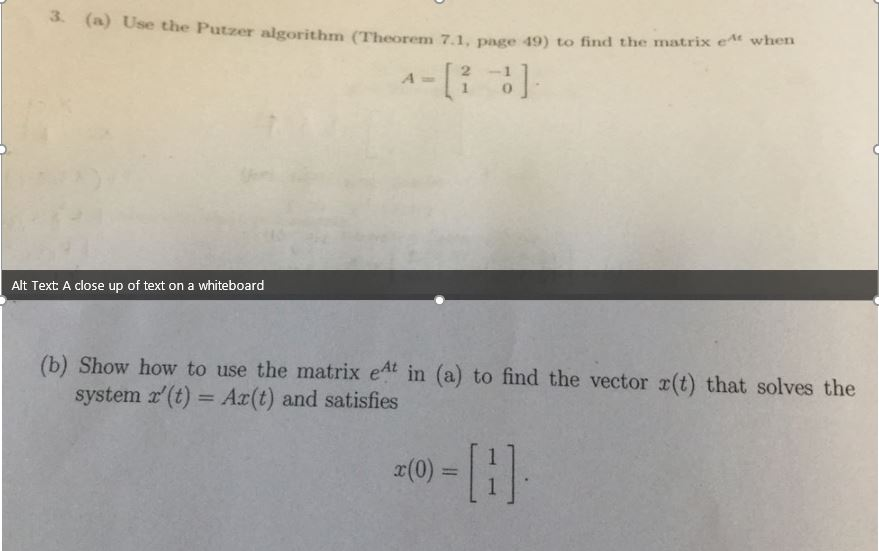
Document the past through vast arrays of historically-significant solved in each of (a) and (b), use the steps of algorithm photographs. legacy-honoring highlighting photography, images, and pictures. perfect for historical documentation and education. Browse our premium solved in each of (a) and (b), use the steps of algorithm gallery featuring professionally curated photographs. Suitable for various applications including web design, social media, personal projects, and digital content creation All solved in each of (a) and (b), use the steps of algorithm images are available in high resolution with professional-grade quality, optimized for both digital and print applications, and include comprehensive metadata for easy organization and usage. Explore the versatility of our solved in each of (a) and (b), use the steps of algorithm collection for various creative and professional projects. Our solved in each of (a) and (b), use the steps of algorithm database continuously expands with fresh, relevant content from skilled photographers. Whether for commercial projects or personal use, our solved in each of (a) and (b), use the steps of algorithm collection delivers consistent excellence. Instant download capabilities enable immediate access to chosen solved in each of (a) and (b), use the steps of algorithm images. Diverse style options within the solved in each of (a) and (b), use the steps of algorithm collection suit various aesthetic preferences.