


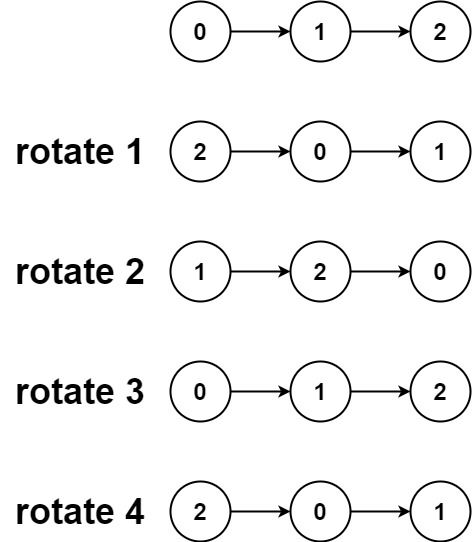
![[LeetCode] Rotate Array](https://velog.velcdn.com/images/bins1225/post/cd5f8434-3d63-4055-80cb-c25b9881870b/image.png)


![[Essential LeetCode] Find Minimum in Rotated Sorted Array + [follow-up ...](https://i.ytimg.com/vi/fY_zDUk1RIU/maxresdefault.jpg)


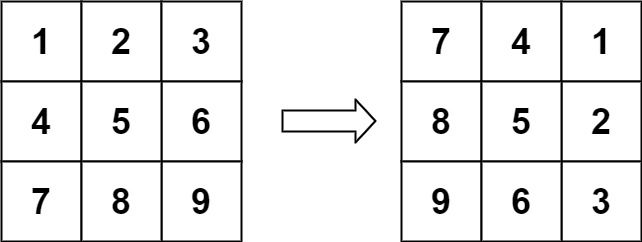
![Leetcode 48. Rotate Image - Matrices [Explanation with code] - YouTube](https://i.ytimg.com/vi/le2gPC814CQ/maxresdefault.jpg)


Learn about rotate array #5 | leetcode explained and solved with notes - youtube through our educational collection of countless instructional images. designed to support various learning styles and educational approaches. bridging theoretical knowledge with practical visual examples. Discover high-resolution rotate array #5 | leetcode explained and solved with notes - youtube images optimized for various applications. Excellent for educational materials, academic research, teaching resources, and learning activities All rotate array #5 | leetcode explained and solved with notes - youtube images are available in high resolution with professional-grade quality, optimized for both digital and print applications, and include comprehensive metadata for easy organization and usage. Our rotate array #5 | leetcode explained and solved with notes - youtube images support learning objectives across diverse educational environments. Advanced search capabilities make finding the perfect rotate array #5 | leetcode explained and solved with notes - youtube image effortless and efficient. Comprehensive tagging systems facilitate quick discovery of relevant rotate array #5 | leetcode explained and solved with notes - youtube content. Each image in our rotate array #5 | leetcode explained and solved with notes - youtube gallery undergoes rigorous quality assessment before inclusion. Multiple resolution options ensure optimal performance across different platforms and applications. Our rotate array #5 | leetcode explained and solved with notes - youtube database continuously expands with fresh, relevant content from skilled photographers.