


![LeetCode Explained - Two Sum [SIMPLE SOLUTION] - YouTube](https://i.ytimg.com/vi/MJ2Y2V9Dvdg/maxresdefault.jpg)


![[LeetCode] 1. Two Sum - YouTube](https://i.ytimg.com/vi/iLf352s1PIs/maxresdefault.jpg)


![Two Sum Solution [LeetCode 1] | ION HowTo](https://www.ionhowto.com/wp-content/uploads/2021/07/Two-Sum-Solution-LeetCode-1.png)


![[Leetcode] - Two Sum Solution – with Video Example – Study Algorithms](https://i0.wp.com/studyalgorithms.com/wp-content/uploads/2021/01/Screenshot-2021-01-10-040252.png?ssl=1)


![[Leetcode] - Two Sum Solution – with Video Example – Study Algorithms](https://studyalgorithms.com/wp-content/uploads/2021/01/Screenshot-2021-01-10-040524-1024x572.png)


![LeetCode #1 [Two Sum] In C Language Solutions - YouTube](https://i.ytimg.com/vi/KeDD1Y4lgEQ/maxresdefault.jpg?sqp=-oaymwEmCIAKENAF8quKqQMa8AEB-AH-CYACpAWKAgwIABABGCkgUSh_MA8=&rs=AOn4CLDxq6CoQLgb52PrzJL_3DcLq0903Q)
![[Leetcode] - Two Sum Solution – with Video Example – Study Algorithms](https://i0.wp.com/studyalgorithms.com/wp-content/uploads/2021/01/Screenshot-2021-01-10-040039.png?resize=1536%2C1013&ssl=1)
![[Leetcode] - Two Sum Solution – with Video Example – Study Algorithms](https://i0.wp.com/studyalgorithms.com/wp-content/uploads/2021/01/Screenshot-2021-01-10-040252.png?resize=1024%2C672&ssl=1)


![[자료구조 알고리즘] LeetCode 1. Two Sum 설명 & 자바로 구현 - YouTube](https://i.ytimg.com/vi/FHphOv2mmIA/maxresdefault.jpg)


![[LeetCode] #1_Two Sum. 解題紀錄 | by I caught a code | I Caught a Code | Medium](https://miro.medium.com/v2/resize:fit:1200/1*UENxkgwifBXQj2gpCrSiow.png)


![[Leetcode 1] Two Sum - 4가지 방식의 풀이](https://img1.daumcdn.net/thumb/R1280x0/?scode=mtistory2&fname=https:%2F%2Fblog.kakaocdn.net%2Fdn%2FbbPGui%2FbtsCyMjHFBf%2F5m5l3dwarZWVOBfy5XmSiK%2Fimg.png)


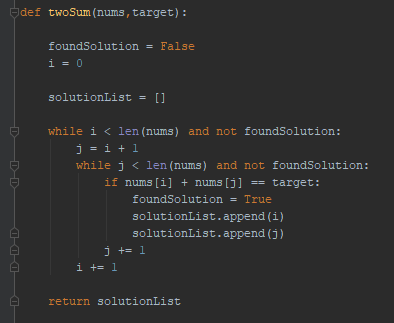
Plan adventures with our travel 1. two sum | leetcode step-by-step solution video | two sum explained gallery of hundreds of inspiring images. exploratively showcasing computer, digital, and electronic. designed to inspire wanderlust and exploration. Discover high-resolution 1. two sum | leetcode step-by-step solution video | two sum explained images optimized for various applications. Suitable for various applications including web design, social media, personal projects, and digital content creation All 1. two sum | leetcode step-by-step solution video | two sum explained images are available in high resolution with professional-grade quality, optimized for both digital and print applications, and include comprehensive metadata for easy organization and usage. Discover the perfect 1. two sum | leetcode step-by-step solution video | two sum explained images to enhance your visual communication needs. Each image in our 1. two sum | leetcode step-by-step solution video | two sum explained gallery undergoes rigorous quality assessment before inclusion. The 1. two sum | leetcode step-by-step solution video | two sum explained archive serves professionals, educators, and creatives across diverse industries. Diverse style options within the 1. two sum | leetcode step-by-step solution video | two sum explained collection suit various aesthetic preferences. Whether for commercial projects or personal use, our 1. two sum | leetcode step-by-step solution video | two sum explained collection delivers consistent excellence. The 1. two sum | leetcode step-by-step solution video | two sum explained collection represents years of careful curation and professional standards.